Friday, October 28, 2016

Meow or Never Quilt :: A Finish

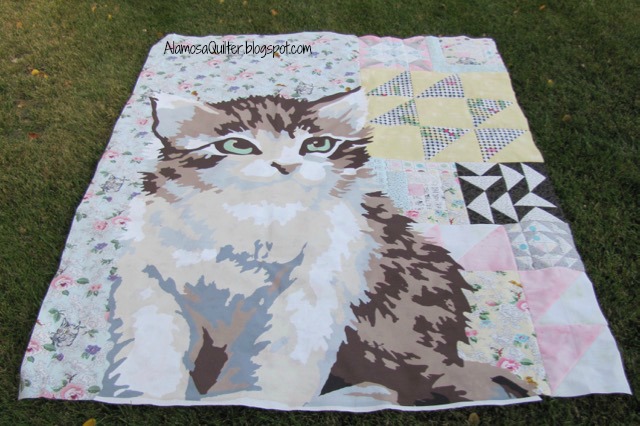
I was able to get this quilt quilted over the weekend and finished the binding last night.


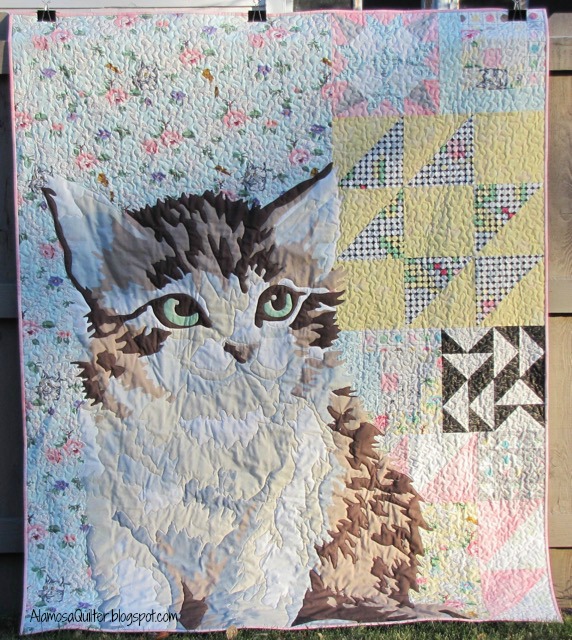
I love how it turned out! For the back I chose a dot print from the fabric line. When it is up close you just see dots, but when you stand back ...


the dots make a design of flowers in a vase. The reason some of the vases are upside down is because I had to piece the back.

All the details of this quilt are in my previous post on this project. Click here to read that post.


Wednesday, October 26, 2016

Mini Pumpkins :: A Finish

I finished my Mini Pumpkins quilt! This was so fun and quick to make. Although it did take me several hours to quilt it, about 5 hours.


The pebble quilting is time consuming but worth it! The pumpkins and stems are quilted in the ditch. If you want to see what it looked like before quilting, click here.

The finished size is 36" by 36". 


Monday, October 24, 2016

Strip and Flip :: A Finish

I finished the Strip & Flip quilt I shared with you recently. The pattern details are all in the link.


It was fun to quilt.


I thought about quilting it horizontally following the piecing lines but decided to change things up and quilted it vertically instead. Simple lines of loops made for speedy quilting.

For the back I used the woven-look print from the fabric line.


The quilt measures about 46" by 54" so it is wider than width of fabric. The brown text print from the fabric line matched nicely with the woven-look print so I was able to extend the fabric with a strip along the side to make it wide enough.

For binding I used leftover strips from the jelly roll. So one jelly roll and 1/4 yard of contrast fabric for the vertical strips on the front are all that is required for the top and binding of this quilt. This one will be a shop sample but I plan to make another using Judy's fabric for my guild's oncology project.


Friday, October 21, 2016

Art Group Project :: Part 3

For the details about this project, click here to go to my first post about it and click here for the second post.

We have completed three rounds at this point and this is what mine looks like at the moment.


The first border is migrating geese, the second is improv piecing and the third is "3-D". I interpreted that as a flange, the thin black line around the outside. We received our instructions for the fourth round on Tuesday. I already have my plan. I just need time to do it.


Wednesday, October 19, 2016

Goose on the Loose :: Block 9

This is the block for this month.


To make it you will need:

(1) 3.5" square of background fabric for the center
(3) 4.5" squares of scrap fabric for the geese
(12) 2.5" squares of background fabric for the sky surrounding the geese
(4) 5" squares of scrap fabric for the corner blocks
(16) 3" squares of background fabric for the corner blocks

From the (3) 4.5" squares of scrap fabrics and the (12) 2.5" squares of background fabrics make twelve flying geese units using your Wing Clipper Ruler. If you made extra flying geese units previously, use them instead. The finished size of your flying geese should be 1.5" by 3", which means that you need to trim them to 2" by 3.5" before sewing them together.

If you don't have a Wing Clipper ruler you can still make the block using the Flip, Flip, Finish technique. You would need (12) 2" by 3.5" rectangles for your geese and (24) 2" squares of background fabric for the sky surrounding the geese.

If you need details about using the Wing Clipper ruler or the patterns for previous blocks, click here go to the Goose on the Loose Quilt Along page.

To make the corner blocks, draw a diagonal line on the back of each of your (16) 3" squares of background fabric. Take one of your (4) 5" squares. Lay one of your (16) 3" squares of background fabric right sides together on a corner of the 5" square.


The diagonal line should be going from one side of the 5" square to an adjacent side. See photo above. Sew on the diagonal line, trim off the excess 1/4" away from the sewn line and press the triangle back. You should again have a 5" square.

Repeat for the opposite corner.


Then repeat for the remaining two corners.


Sew your flying geese units together in groups of three. These should measure 3.5" by 5".


Then layout your pieces as in the photo below.


Sew it together in rows and you are done!


Monday, October 17, 2016

Meow or Never Kit

We recently received the fabric line Meow or Never from Moda in my shop. I ordered some kits with the fabric.


Moda kits are always so nicely packaged!

Over the weekend I was able to complete the quilt top.


It was too windy to hang it on the fence to photograph it, not that it would fit well on my fence anyway. The quilt finishes at 60" by 72". The kitty is a digital print. This means that the kitty is printed as you see her on a big piece of fabric. All you have to do is cut her out and fuse her on. Since she is so big, bigger than any ironing surface I have, it is a challenge to get her properly placed and fused. I ended up laying out the top on my basting tables and ironing directly on the table. Didn't hurt the table at all!

I didn't bring home any backing fabric from the shop so I didn't get her quilted. Just as well because this way I had time to do a little personal sewing. I'll show you that later this week.


Wednesday, October 12, 2016

Pumpkins are In Season

The latest issue of Simply Moderne magazine contains the Mini Pumpkins pattern made using the mini quick curve ruler. I've been wanting to make this pattern for some time and decided that "someday" had arrived.


This went together pretty fast for me. It is only 36" square so that helped. Looking forward to getting this one quilted!


Monday, October 10, 2016

Farewell Judy

One of my guild's long time members passed away recently after a 3 year battle with cancer. Her husband gave the guild her fabric to be used in our quilts for oncology project. Rather than just taking her fabric to the next guild meeting and putting it out hoping that folks will take it and bring it back in the form of a finished quilt for oncology, it was brought to my store. Some guild members will come next week to begin the task of sorting and cutting it into kits. To start with we are going to cut 2.5" by WOF strips. I came up with three easy patterns that only use 2.5" strips.

The first one is the Strip & Flip Quilt. The tutorial is by Cluck Cluck Sew, but I altered it to use 2.5" strips instead.


Mine will finish at about 45" by 54". I followed the tutorial for the most part. The things I changed are (1) I used 2.5" by WOF strips only; (2) I didn't cut my strips down to 36", I left them WOF; (3) for the solid strips I again used 2.5" strips. I needed 3 and cut the third one in half and sewed each half to the other two strips then cut them to length.

The second pattern is Garlic Knot, also known as Arrowhead Puzzle Block.


I only made a single block to test the directions I found online. I'm glad I tested it because the ones I found were incorrect. They were free directions so I can't complain. I've found that most of the time in this life you get what you pay for. I don't have a link to share for this one since the directions I found online were wrong. Maybe you will have better luck. At some point in the future I may upload my own directions but not today.

The third pattern is called Jiffy Jelly Quilt. It is a free pattern from Moda. The pattern is really nice (an exception to the rule about getting what you pay for) so I didn't feel the need to make a sample.

I hope that with these three patterns and Judy's fabric we can make some beautiful quilts for the oncology department of our local hospital.


Friday, October 7, 2016

Coloring Fabric Challenge Results

Last week I did an in-progress post on my coloring fabric challenge. Click here to read that post.

I'm happy to report that everyone has completed their projects and they are all so different!

Here is mine. I did a simple name banner wall hanging.


Peg put her name on a shirt.


Vicki embellished an apron.


I used Inktense pencils to color mine. Peg used watercolors. Vicki used crayons. 

Instead of doing an entire name, you could also just use the first initial on something. I thought an initial on a notebook cover would look cute.


Wednesday, October 5, 2016

Fancy Forest :: A Finish

I'm so thrilled to have this one finished!


I love the way it turned out. I tried a new-to-me quilting design. I wanted something vertical and linear-ish, but I didn't want to do straight lines or wavy lines. It was fairly easy for me to stitch once I practiced a bit and it didn't take very long. The fact that this is a smaller quilt helped with the speed too. I'm definitely going to use this quilting motif again. 

To see the difference the quilting made on this project, click here to see it unquilted.


Monday, October 3, 2016

Be My Neighbor

Have you heard about the free block of the week Moda is doing? It's called Be My Neighbor.

This is the layout.


There will be 16 blocks. The first four block patterns have been released. One of my employees is making it up for the shop. Her maiden name is "House" so we felt she needed to do this one. She has completed the first three blocks.


If your local shop is not participating, feel free to head over to my shop website, Alamosa Quilt Company, to get the free patterns. Click on the Be My Neighbor logo on the front page of my shop website to go to the patterns and get the details for this free block of the week program.